Picoturbine
I have no connection with picoturbine.com.
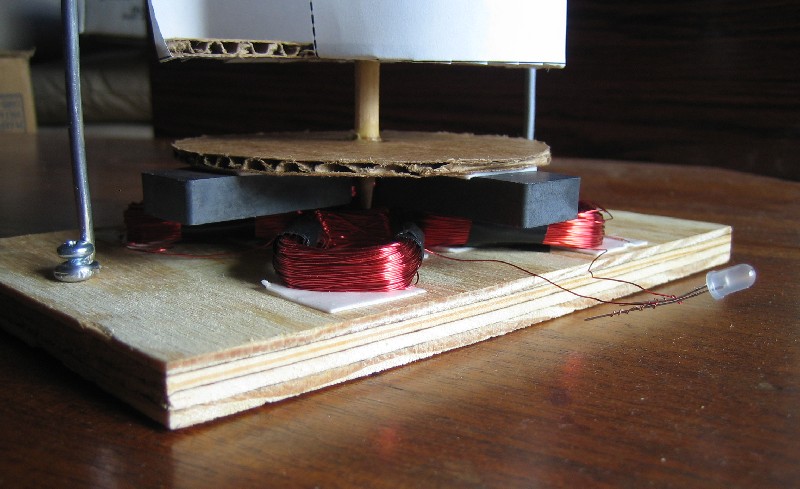
I purchased a kit, assembled it, and here's the result...

It's easy to test by spinning the main shaft with your fingers at the top.
I was able to blow at it and get the two-color (red/green) LED to glow brightly.
Here's a video of my Picoturbine...
picoturbine.avi (20MB)
Comments:
It took me significantly more than an hour.
I tried to be careful and do a neat job.
It think it would still work ok if I'd been quick and sloppy.
I changed a few things from the directions...
- Using Elmer's Wood Glue, I glued the rotor (with magnets) to the main (vertical) shaft instead of using the little clips they provided.
The result is more solid and stable.
I will point out that gluing has two caveats: it adds extra time and you have to be sure of the correct location and alignment as you can't tweak it later on.
- Using the double-stick tape provided, I taped the coils of wire directly onto the wood base rather than onto the cardboard form they describe in the instructions.
I think it makes the design a little cleaner,
but it then requires you to use glue (per above comment) as the cardboard with magnets (rotor) then needs to be too close to the tapered portion of the shaft for their clips to work.
- I spaced the magnets and coils a little further apart than the template showed.
This makes it generate slightly more voltage at a slightly lower speed.
I think it would work fine the way they have you do it.
Gluing is what takes time.
If you use a fast drying glue, this project will go much faster.
Although not for younger kids, I think "hot glue" would be ideal.
Their double-stick tape works just well enough.
Teaching a Class
Before teaching a class of kids to do this project, I would highly recommend building it first yourself.
If I had only an hour, I might recommend dividing kids into teams.
Each Team:
- Team Member 1 "mechanical": Cut out the 4 cardboard cutouts and poke the hole in their centers.
Get this going first as others are waiting!
(Note: my images only show 3 cutouts as I did not use the "stator")
Carefully arrange (for good balance) and double-stick tape the magnets onto the rotor cutout.
Poke the shaft through the rotor (with magnets) and work with Team Members 3 and 4 to get the right height.
Secure the rotor to the shaft using the provided clips. (I used glue here but would not recommend it for class)
- Team Member 2 "artist": Cut and color the 2 paper sails.
Glue these to their supports from Team Member 1. (this requires some dexterity)
- Team Member 3 "electrical": Sand the coil ends to remove the red insulation.
Double-stick tape these onto the form from Team Member 1.
Twist all wire ends together to make a circuit with the LED light.
Make sure the tops of the coils are mashed down flat, clear of spinning magnets.
- Team Member 4 "structural": Uncoil and straighten out the fat aluminum wire which will form the frame.
Bend it into shape to the correct dimensions. (this takes some skill with pliers)
Carefully place the screws on the base and screw them down. (this takes some strength and agility with a good-fitting screwdriver)
- All Work Together: Slide the completed wind sail assembly onto the shaft.
Balance the shaft on the center screw (bearing support) and make any adjustments so it spins freely.
Assemble the fat aluminum wire structure and adjust so rotor spins freely.
Glue the wind sail structure into place when ready.
- Test by spinning.
- Test by blowing.
- If windy, test outside.
- Talk about what was hard, what was fun, and what you'd do differently next time.
- Talk about ways to make improvements.
- Write about it ... on your own web page! :)
This is a LOT to do in one hour!
I did a simple experiment which you may want to explore.
Spin the rotor to a known speed and note how long it takes to spin down (e.g., till the red LED no longer lights).
Spin the rotor up to the same speed.
Now short the LED wires together (short the wind generator's output).
Now note how long it takes to spin down.
Rich Reel 23 July 2007 ALL8.com